Ask any of my friends about my keyboard "problem", and you're sure to get a laugh. Not because I have a glass case of collector's edition mechanical keyboards, but because I have been on a constant quest to find the "best" keyboard for coding the past few years. In the process, I've gone through a handful of keyboards. Not to say I've tried everything, but all of the "consumer" keyboards I tried weren't "it", so I did something drastic...
So what were my criteria for the perfect hacker-friendly keyboard?
- ☑️ Split / ergonomic — yep, I'm one of those
- ☑️ Numpad (for window snapping on my 4k monitor)
- ☑️ Mac-friendly (remapping Windows keys sucks — more on this later)
- ☑️ Tenting for comfort
- ☑️ Wireless
So which consumer keyboard is wireless, is Mac-friendly (modifier keys), is ergonomic (split), and has an excellent typing feel? None of them.
The backstory
You need to hear the somewhat comical story of what led me here.
One of the first "desktop mac" keyboards I used was the Logitech Solar Mac Keyboard. It was... okay. It worked for a while, but the typing feel wasn't much better than a laptop. Since I have big hands it seemed cramped at times... not to mention caused my hands to legitimately cramp after marathon usage. A previous coworker warned me against buying this keyboard. Even with his word of caution, I bought it anyway.
After the first year, the problems started. Gradually, they irritated me day by day. When your job is to type things and creatively solve problems, a keyboard that just works is pretty dang important. It occasionally started skipping keystrokes and losing reliable connectivity. This was fine at first, but as it became more frequent, my anger built.
I don't rage at things often. One day though, I got fed up with that Logitech keyboard. Skipping the occasional keystroke was one thing. However, when it would "pause" registering keystrokes for 10 seconds, and then 30 seconds later it would repeat them tenfold in a vomit of characters on the screen, I lost it. Channeling my inner Incredible Hulk, I "hulk smashed" the thing into the ground, bending it in half. Keys and plastic went flying in a tornado of green rage. Never have I felt better about destroying something — nobody was at home to witness my loss of control. Regardless, it was worth it. I should've listened to my old coworker's advice. Thanks, Joby, you were right.
So after that (being obsessed with office ergonomics at the time), I decided to go with a split keyboard layout. During this era, I went through several Microsoft keyboards, like the Sculpt Ergonomic Keyboard and the even fancier Surface Wireless Ergonomic Keyboard. Some of you might be thinking, "but you didn't try the Kinesis Freestyle?" No, I didn't, I'm a bad man.
The Microsoft keyboards were better, but one main thing sucked about them: I had to remap the modifier keys. It worked but made transitioning between my MacBook Pro and desktop computer painful. Nothing seemed to be in the same spot. I just never got used to it, even after months of trying. Especially on the Surface Ergonomic Wireless keyboard — the function key placement on that thing was super annoying.
These keyboards all worked, but I felt like I was making them work, instead of having them work for me. Something that some of the best programmers I know pursue relentlessly: making your tools work for you by trying to refine their workflow — often. It was time I did that.
The Revelation
After meditating on why these keyboards weren't ideal, I did something drastic.
I tossed out my criteria and started over.
The split layout was still a must, as well as prime modifier key placement. It didn't have to be wireless, and I became more open-minded about what a keyboard could be. While researching other consumer options, I discovered something even better — building a keyboard. Amazingly, I had never considered this option! Having built a bunch of drones (soldering experience) and being a software developer made this idea even more intriguing. Shortly into my research, I discovered the mechanical keyboard community on Reddit. Beware — it goes deep.
I soon learned about 40 and 60 percent boards. Keyboards with only a fraction of the keys on a typical 104-key layout. My initial reaction was, "how the heck can you do anything (outside of vim) as a coder without arrow keys?" Let me tell you, you can, and it is so liberating to change your mindset on how a keyboard can work.
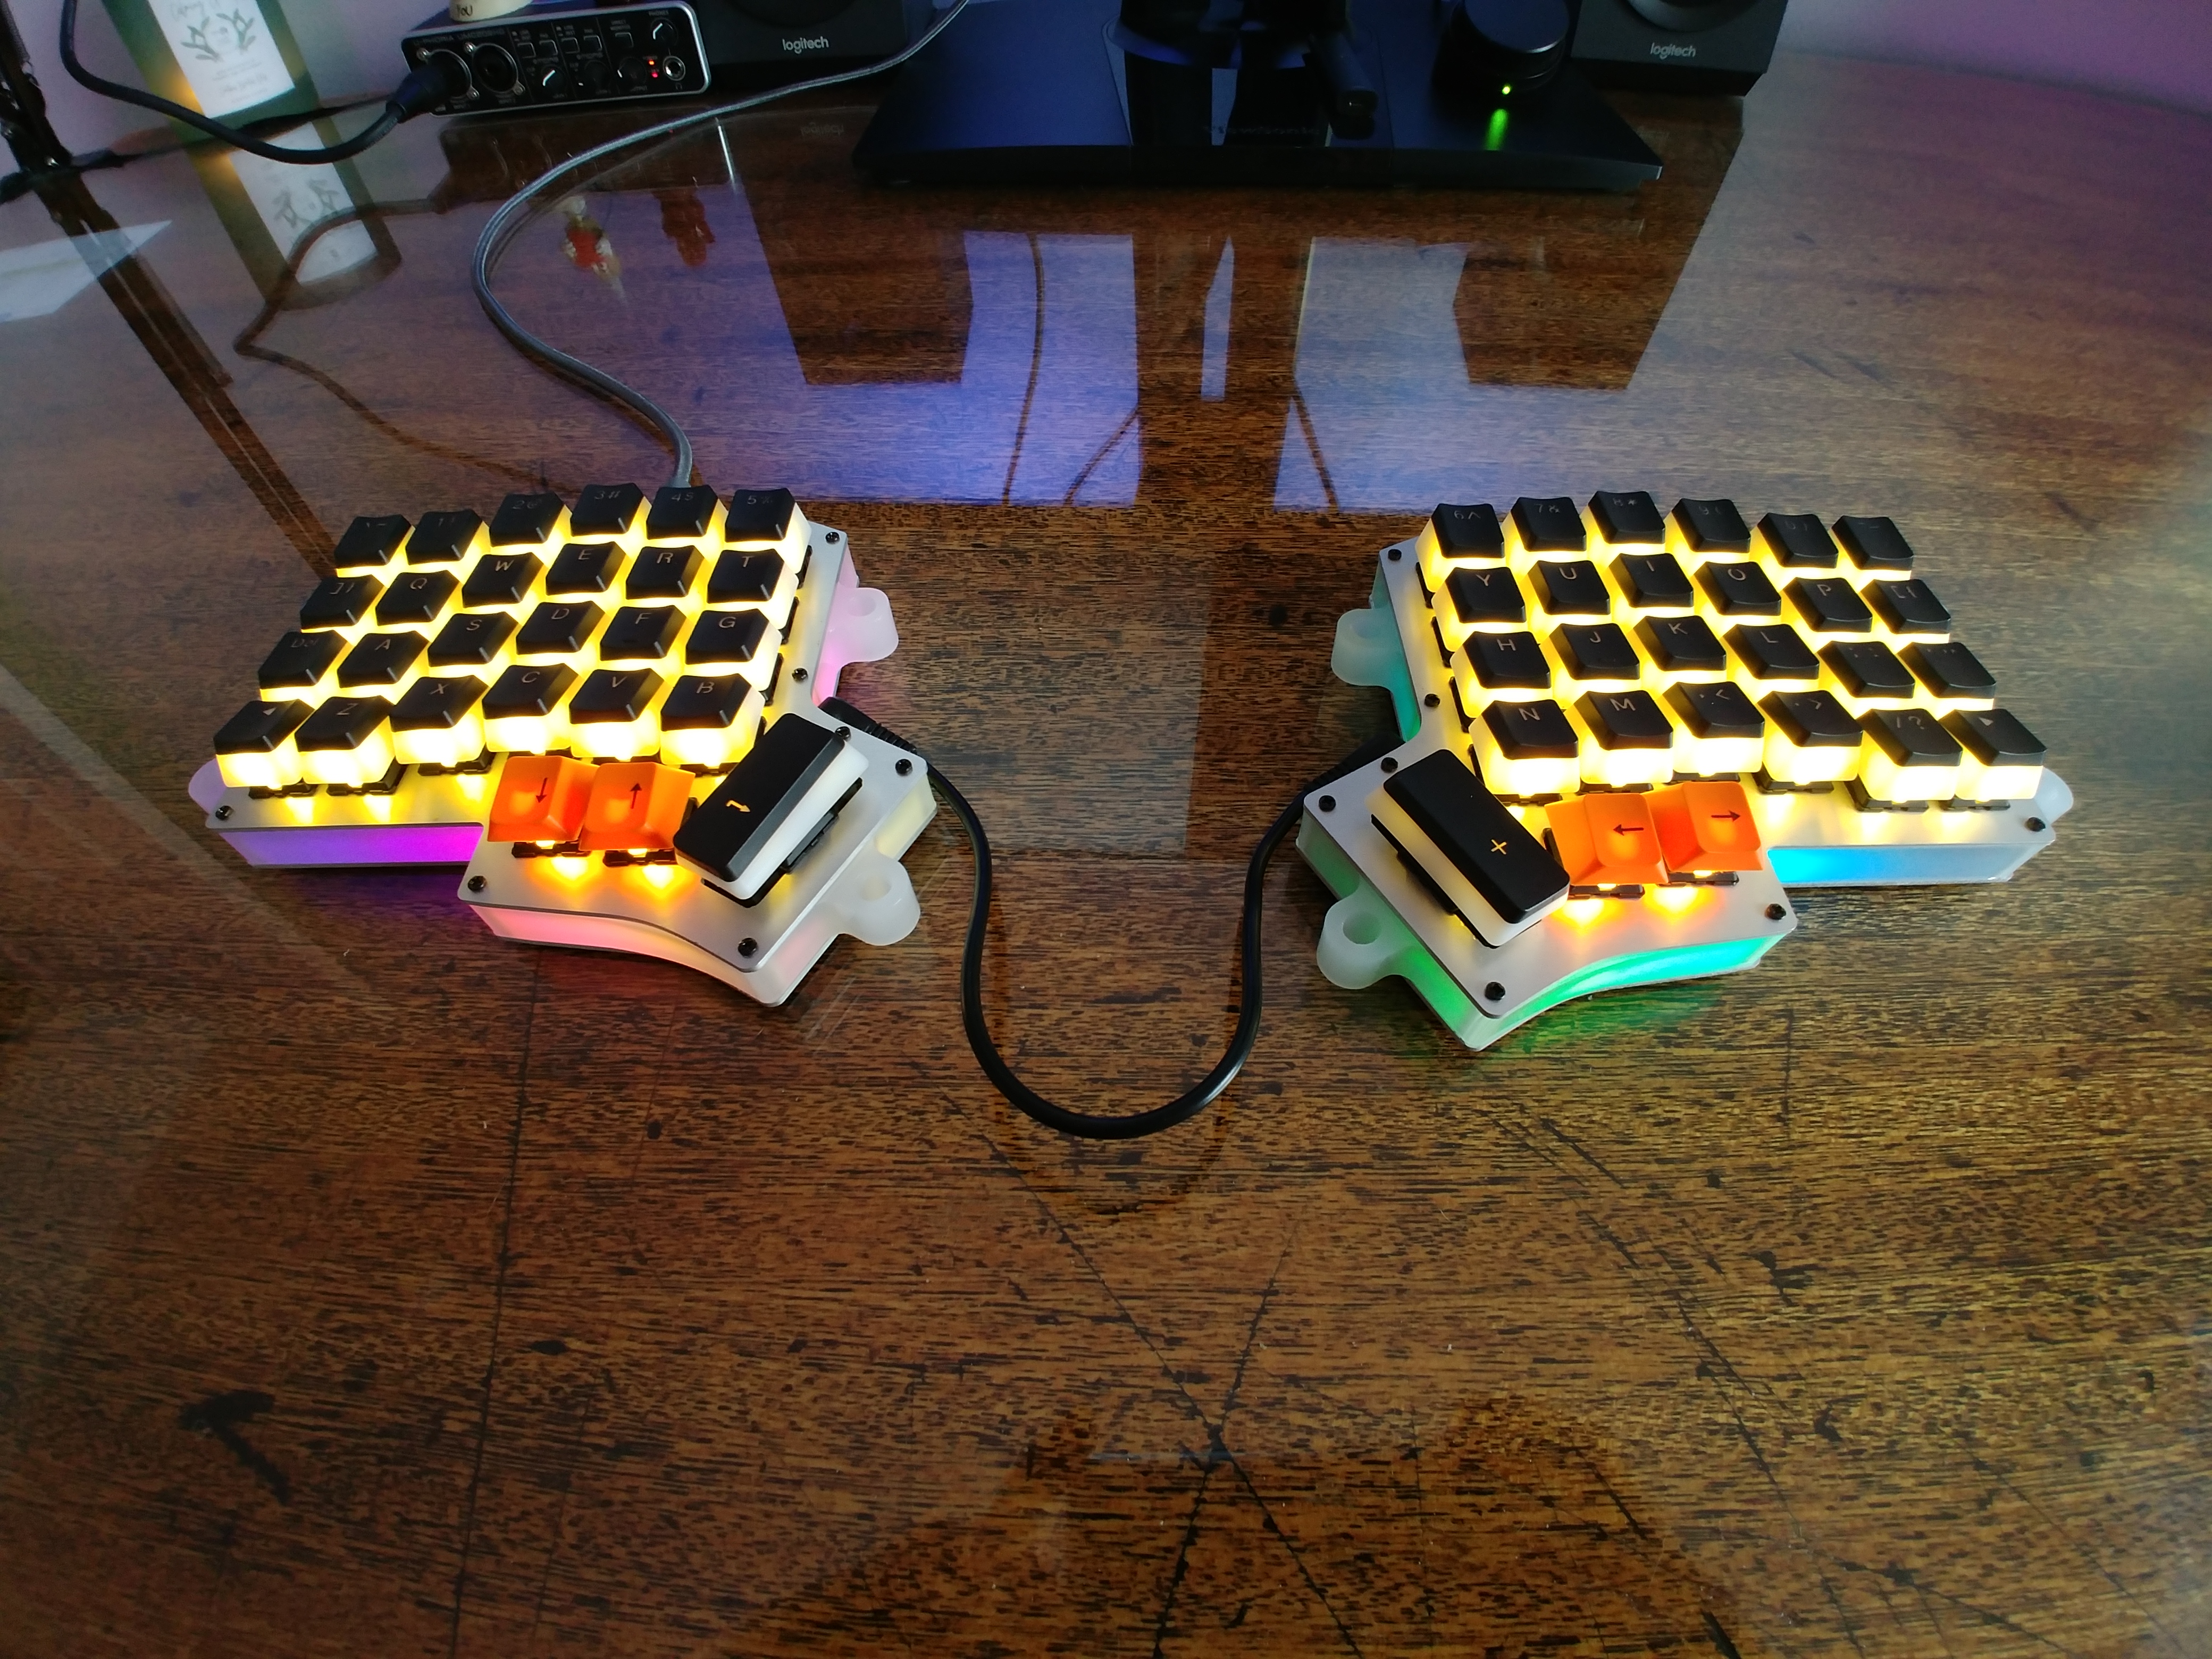
Next, I checked out the best split options and started narrowing down the available PCBs (Printed Circuit Boards). To me, the 60 percent boards seemed to be the sweet spot between enough keys to get work done, while still cutting down on finger travel (one of the significant benefits of smaller layouts). Finally, I settled on the Iris from keeb.io. After all, half the fun is building it and soldering a zillion diodes, the microcontroller, the LEDs, and all the switches yourself, right? 😅
Note that you don't need to solder anything but the switches on the new revisions of the Iris. Now it's even easier to become a keyboard wizard! 🧙♂️
So I built it. Here's what it looked like at the time. (Now I've added Ergodox Tilting Legs)
Switches and Choices
When you build your keyboard, the choices for switches can seem overwhelming. That's not even including decisions about LEDs and other peripherals like rotary encoders! I had tried the tactile mechanical keyboards with "bump" switches from friends, and I didn't like them. Not to mention they are super loud! I elected to go with Cherry MX "silent" switches. For the record, they're still too loud, oh well. After being used to scissor-switch mechanisms on laptop keyboards, transitioning to mechanical switches feels terrific. I might even build another one (on stream, of course!) with different switches, probably some of the low profile Kailh ones.
The other decisions to make were LEDs under the switches (yes), and whether to use split thumb keys or join them together (see the big inner keys in the photo above). Here I went all-in on the "fewer keys is best" idea, so I chose to combine the thumb keys. The other way would probably work for me too, but I feared my sausage thumbs would cause accidental keystrokes. In hindsight, I've found that fewer keys are indeed better, so I'm happy with the decision. Also, for the record, I do not usually run the (switch) LEDs at that brightness.
Getting used to it, and the now
So I got the thing working, then delved into learning about the QMK Firmware. Initially, I tried a few keymaps from the QMK repository, but eventually decided it would be best to build my own. This way, I could keep an open mind about what a keyboard could be instead of trying to learn somebody else's layout. After a year and a half of using it, I still love it. I've even adapted many of the ideas to my MacBook keyboard using software mapping.
Getting used to it only took about two weeks. Not bad considering I made my very own keymap from scratch. It took a little fiddling, but was worth it!
These were the toughest things to get used to:
- The columns were staggered instead of the rows — an "ortholinear" layout
- The 1u sized (smaller) shift buttons
- Using a weird new keymap (actually the easiest of the three)
For the first week or so, I was continually flashing new keymaps and iterating on the layout. Once I was mostly happy with it, I spent an hour on Type Racer to get my typing back up to speed. Now I'm consistently typing 80+ words a minute, which is excellent for coding and writing.
Behold, the Wizard Key Map 🧙♂️
When I built my keyboard layout, I knew one thing for sure — I was sticking to QWERTY. What, you thought I was one of those crazy Dvorak layout guys? I didn't have the guts to switch the main keyboard layout I was used to while also learning a 60% board. That's just nuts.
With mechanical keyboards, especially boards with a less-than-normal amount of keys, you use multiple layers instead*.* Think of it like holding Shift on a regular keyboard (mine also has a shift layer, that's standard).
The three layers I use will be referred to as Default, Lower, and Raise. Below is an ASCII representation of the three essential layers. I'll explain the Default (QWERTY / main typing) layout first. Then we'll move to the other layers. Lastly, we'll go over some of my favorite tricks, custom keys, and areas where I could improve it.
Three things to remember when reading this section:
- The keyboard has multiple "layers," which determine what each key corresponds to
- The Default Layer is the layout when no keys are pressed.
- The other layers are activated by holding down a key (usually with a thumb)
Default Layer
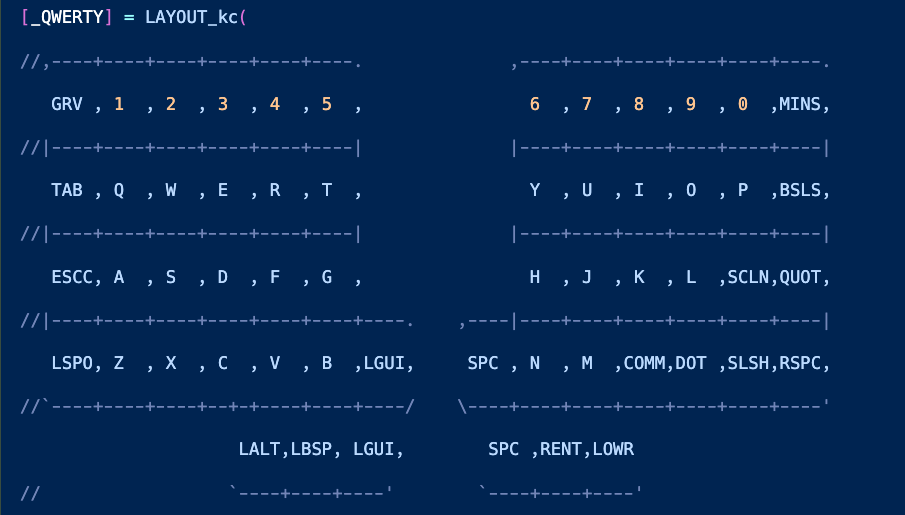
You can probably guess some of the keys, while others are more cryptic. Starting at the top left in the first row: the GRV key stands for ` (accent grave AKA backtick). The numbers are self-explanatory, and at the top right you have MINS which stands for "minus" -. So far, not much different than a typical keyboard.
The second row is mostly the same as you're used to, so no explanation is needed.
The third row, however, starts with a unique key. You'll see ESCC 🤔 ... what do you think that stands for? It's "Escape and Control." This is a special QMK firmware feature known as a Mod-tap key. It actually has two functions! When it's held, it acts like a modifier key (Ctrl, Shift, etc...), but when it is tapped, it becomes another. In this case, it acts as Ctrl key when held, and becomes Escape when tapped.
If you think about it, you pretty much never need to hold down on the escape key... usually it's furiously smashing it, so this works great.
You may notice it's in the usual spot of the CapsLock key and think, "but I need that key!" My response would be CapsLock is pretty much useless... plus, with QMK you could map it to somewhere else for the rare times you might need it. This is one of my favorite patterns (mapping Escape and Ctrl to the caps lock key), and one I use on my MacBook keyboard too — I highly suggest trying it out.
The rest of the third row is the same as a regular keyboard with one exception... we don't have enough keys to fit the much-used Enter key! Don't worry, that will come later, along with the reasoning for why it moved to a new home. The last two in the third row are SCLN (semicolon), and QUOT (single quote), as is typical with most keyboards.
The fourth row has some variation we haven't seen yet, and we're getting to the thumb keys, the real gold of this keyboard! Starting on the left, you'll see LSPO — it stands for "Left Shift Parenthesis Open." So when you tap it, it types (, and when held, it acts like a normal Left Shift. Have I mentioned I love Mod-tap keys? This is called Space Cadet Shift and has been a huge boon to programming productivity... no more reaching up and holding shift to hit the wrong number key.
Moving along the fourth row, near the middle, you'll see LGUI. That's just fancy talk for Command or Windows keys. Depending on which OS you're in, it sends the proper key code... I think Linux calls it Super? 🤷♂️ The next big thumb key is SPC — a simple spacebar. I'm a "right-handed spacer," so I only need one spacebar with the split layout. The rest of this row is like a typical layout except the last one, RSPC, "Right Shift Parenthesis Close." It works just like the left, but produces a ) when tapped.
To learn more about this
Shiftkey configuration, see **Space Cadet Shift**
Finally, we have the last row, the six thumb keys. There's some more Mod-tap magic, but mostly modifier keys. LALT is simple — "Left Alt," or Option if you're on a mac. This is the only alt key I use, nothing special here. The next one, LBSP, is a unique Mod-tap key I made, which stands for "Lower Layer and Backspace." When held, it converts my keyboard to the Lower layer (remember, these work like a shift key). When I tap this key, it's Backspace.
Think about this for a second. Our thumbs, the most useful digit we have, are underutilized. Having backspace on a thumb key where it's easily accessed is incredible. Instead of awkwardly reaching up to the top right corner to hit backspace (with our poor overused pinky), it's right underneath the thumb: less movement, more productivity.
The next two keys are LGUI and SPC (remember, these are actually one key conjoined to the above row). The next one, RENT, is similar to the "Lower and Backspace" on the other side, but it stands for "Raise and Enter." So it goes to the Raise layer when held, and is Enter when tapped. Having Enter accessible right under a thumb is a game-changer, just like backspace. Usually, I think of my backspace and enter modifier keys as going back (on the left) and moving forward (Enter on the right). Finally, LOWR is just a modifier key to access the Lower layer. Sometimes I use this to help with keyboard shortcuts that don't jive when you try to do them all on the left hand. This might be an area I could improve in the future by mapping it to something else.
The Lower Layer
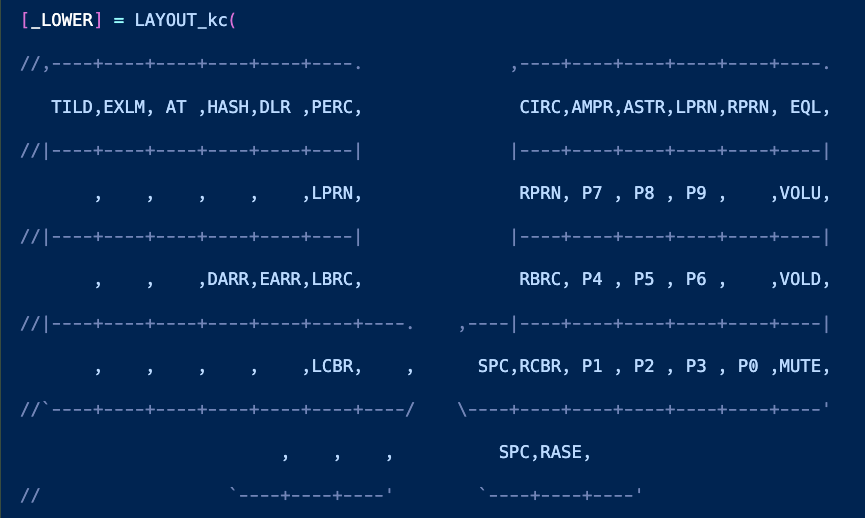
On the Lower layer, we start getting into some more magical reduced-key-layout stuff. This (and the Raise layer) are how you cope with not having all the keys from the regular keyboard layout. For the following section, remember the layer is accessed while holding down a thumb key, LBSP. The Lower and Raise layers also happen to be where I could improve my keymap the most... look at all that empty key real estate!
We'll start with the top row. Not much to say here, this is the equivalent of holding shift on typical keyboards, so you have ~, !, @, #, etc... — all the usual symbols.
Instead of going row-by-row now, I'll explain the areas of keys and the thought process behind putting them where they live. On the left half, you'll see LPRN, LBRC, LCBR — these are just opening parenthesis, square brackets, and curly braces (, [, {. The idea is to keep these close to the home row and continue the "open on the left, close on the right" approach that I mentioned with the Backspace and Enter keys on the previous layer. On the right side, the RPRN, RBRC, RCBR keys act as the closing pairs to the opening parenthesis, brace, and bracket characters. I find this to be much more convenient than having these oft-used programming characters jammed into the top right corner of the keyboard.
The remaining two (unique) keys on the left side are DARR and EARR. These are custom macros that save time while programming with PHP and Javascript. They stand for "Dash Arrow" -> and "Equal Arrow" =>. When pressed, they actually produce both characters in a single stroke. How neat is that? Once I made these... I almost forgot where the equal and dash signs lived 😅.
There are two more sections of keys in this layer, the P1, P2, P3, etc... keys are just like a NumPad, so those don't need much explaining. You can probably guess the other ones on the right side, VOLU, VOLD, and MUTE. Those control system volume up, down, and mute.
The Raise Layer
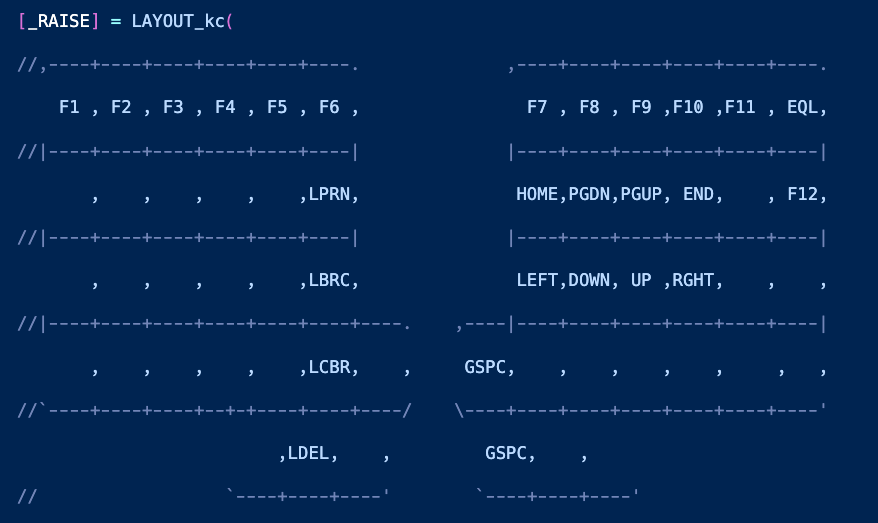
Ahh, we've made it to the final layer! The left side doesn't need much of an explanation. It has the F1, F2, etc..., keys that rarely get used. Also, there's the opening (, [, and { characters just like the lower layer. I put them here because doing the modifier + keypress with one hand often feels awkward and contorted. Usually, it's more comfortable to hold down Raise (my right thumb) and press a key with my left hand.
There is one key on the left side that's worth talking about, LDEL. It's a Mod-tap key which stands for "Lower and Delete." Recall that I also keep backspace on that key, so delete is just the same key but with my (other) thumb on the Raise key. This is intuitive and gives me forward and back (deletion) without moving my hands from the home row!
On the right side are keys I use all the time. I'm a big fan of vim mode in my editor (VS Code), and am used to using the h, j, k, and l keys in place of left, down, up, and right. This is one of my biggest productivity boosters. Instead of moving my hand to use the arrow keys, they're all now accessible on the home row when I hold down my right thumb! I liked this one so much that I mapped this to my MacBook using the right Cmd key as the modifier. Try it, you might like it. 😈
Above the arrow keys, you'll see Home, PageDown, PageUp, and End. These are the "all-the-way" equivalents of the below vim-style navigation keys. Also very useful when navigating code, and just one up from the home row position. Instead of doing Cmd+Left to go to the beginning of a line, I can simply press my thumb down and hit Home on this layer. Too easy!
Room for Improvement
You'll notice that the Lower and Raise layers both have a ton of open keys on the left half. This is an area I plan to experiment with in the coming weeks by adding even more shortcuts. Making more custom macros (phrases or snippets with one keystroke) could really pay off in workflow gains.
For example, some other macros I might make:
$this— a common occurrence in object-oriented PHP programming, it'd be nice to have on a single key. Perhaps I'll even go big and make it$this->.function(— a time-saver for PHP, especially when using anonymous functions in Laravel Collection pipelines.class="— wow, I should've done this one eons ago!() => {}— while not particularly hard to type, it'd be a nice time saver for ES6 functions.if (— not particularly hard to type, but one I may try as an experiment. I'm curious if I could do a fuller form likeif (^) {}and have the cursor start at the caret... 🤔
Edit: Realized I could probably include arrow keys in the macro definition to achieve this 🤯
Beyond adding more macros, writing this article made me consider:
- How often am I using the
Lowerkey on the right side — perhaps I could replace it with something more useful. - Adding other commonly used keys like
-,+,=to the open space on some layers - Other QMK features, such as Dynamic Macros, a Leader Key, or Mouse Keys
TL;DR
Building your own keyboard is fun, but making your own keymap and watching it evolve as you iterate on it is even better. Eventually, you settle in, but it's still this nebulous thing that you can add to — powerful stuff! The more you can do near the home row, the more productive you can be.
In summary, here are some of my favorites from my layout:
- Vim style arrow keys on
h,j,k,l, all the time! - Using my thumbs more — it's our best digit, so it's great to give it more power than "Spacebar." Adding things like
Backspace,Delete, andEnterto these keys has been a game-changer. - Mod-tap keys in general — especially
Ctrl/EscapeonCapsLockand Space Cadet Shift to produce opening and closing parentheses(). - Custom macros, like
->and=>with a single keystroke save time when coding. - Having the
(),[], and{}characters easily accessible near the home row.
What are your favorite key mappings, keyboard tricks, or shortcuts? Send them to me on Twitter — @austencam. I'd love to hear about them!
Thanks for reading!